


Have you ever wondered why restaurant biryani recipe tastes dramatically different from what you make at home?
The aromatic layers of perfectly cooked rice, tender meat, and complex spices that define a truly exceptional biryani often seem impossible to recreate in a home kitchen. However, the secret isn’t exclusive restaurant equipment or mysterious ingredients – it’s actually about technique and attention to detail.
Many home cooks make critical mistakes when preparing biryani, specifically in the rice preparation, meat marination, and the crucial layering process. Furthermore, the traditional “dum” cooking method (slow-cooking in a sealed pot) is frequently misunderstood or improperly executed.
In this foolproof guide, we’ll break down the entire process of creating authentic, restaurant-style biryani step by step. From selecting the right aged basmati rice to mastering the perfect dum cooking technique, you’ll learn exactly how professional chefs create that distinctive flavor and texture. Meanwhile, we’ll help you avoid common pitfalls that lead to soggy rice or undercooked meat.
By the end of this article, you’ll have all the knowledge needed to create biryani that rivals your favorite restaurant’s version – right in your own kitchen.
Choose the Right Ingredients for Authentic Flavor
The foundation of an exceptional biryani recipe begins with selecting the right ingredients. Quality components not only enhance flavor but also contribute to achieving that distinctive restaurant-style texture and aroma that many home cooks struggle to replicate.
Use aged basmati rice for best texture
The cornerstone of perfect biryani is aged basmati rice. Unlike freshly harvested rice, aged basmati (stored for one to two years) has significantly less moisture content, making it ideal for biryani . This aging process enhances the grain structure, resulting in longer and more slender grains that expand beautifully without breaking.
Premium quality aged rice remains separate and fluffy when cooked, rather than becoming sticky or mushy . This is primarily due to its lower starch content, which also makes it easier to digest. Additionally, aged rice absorbs water and spices more effectively, allowing it to soak up the rich flavors of your biryani masala and aromatic spices.
For optimal results, always soak your aged basmati rice for 30-60 minutes before cooking . This crucial step helps the grains absorb water evenly and expand to their fullest potential while retaining their distinctive aroma .
Pick bone-in chicken for juicier meat
Bone-in chicken parts are essential for authentic biryani flavor. Traditionally, whole bone-in chicken pieces are used to make biryani, as the bones infuse the dish with richness and depth.
For consistently juicy and tender results, choose chicken thighs and drumsticks instead of breast meat. These darker cuts contain more fat and connective tissue that break down during cooking, yielding succulent meat that remains moist throughout the lengthy cooking process.
A practical compromise for home cooks is using a mix of bone-in drumsticks and boneless thighs. This combination provides the best of both worlds—rich flavor from the bones and tender, easy-to-eat pieces without compromising on authenticity.
Essential whole and ground spices
Spices are the soul of any biryani recipe. Your spice selection should include both whole and ground varieties:
Whole spices: Shahi jeera (caraway seeds), bay leaves, star anise, cloves, green cardamom pods, cinnamon sticks, and black cardamom.
Ground spices: Turmeric, Kashmiri red chili powder, and biryani masala.
Notably, biryani masala is considerably stronger in flavor than regular garam masala . Although garam masala can be substituted in a pinch, authentic biryani masala contains key ingredients like shahi jeera (caraway seeds) and stone flower (dagad phool) that are not typically found in garam masala .
Quality matters—purchase whole spices from Indian specialty stores rather than supermarkets when possible, as the quality and potency are often superior.
Fresh herbs and ghee for aroma
Fresh herbs play a vital role in creating that unmistakable biryani fragrance. A generous amount of fresh mint and cilantro adds cool, citrusy notes and vibrant color to your dish. These herbs should be finely chopped and added at different stages of cooking for maximum impact.
Above all, use ghee rather than regular oil whenever possible. Homemade ghee adds an authentic taste and aroma that’s impossible to replicate with ordinary cooking oils . As one experienced cook notes, “Ghee is the heart and soul of biryani,” providing a rich, nutty foundation that elevates all other flavors .
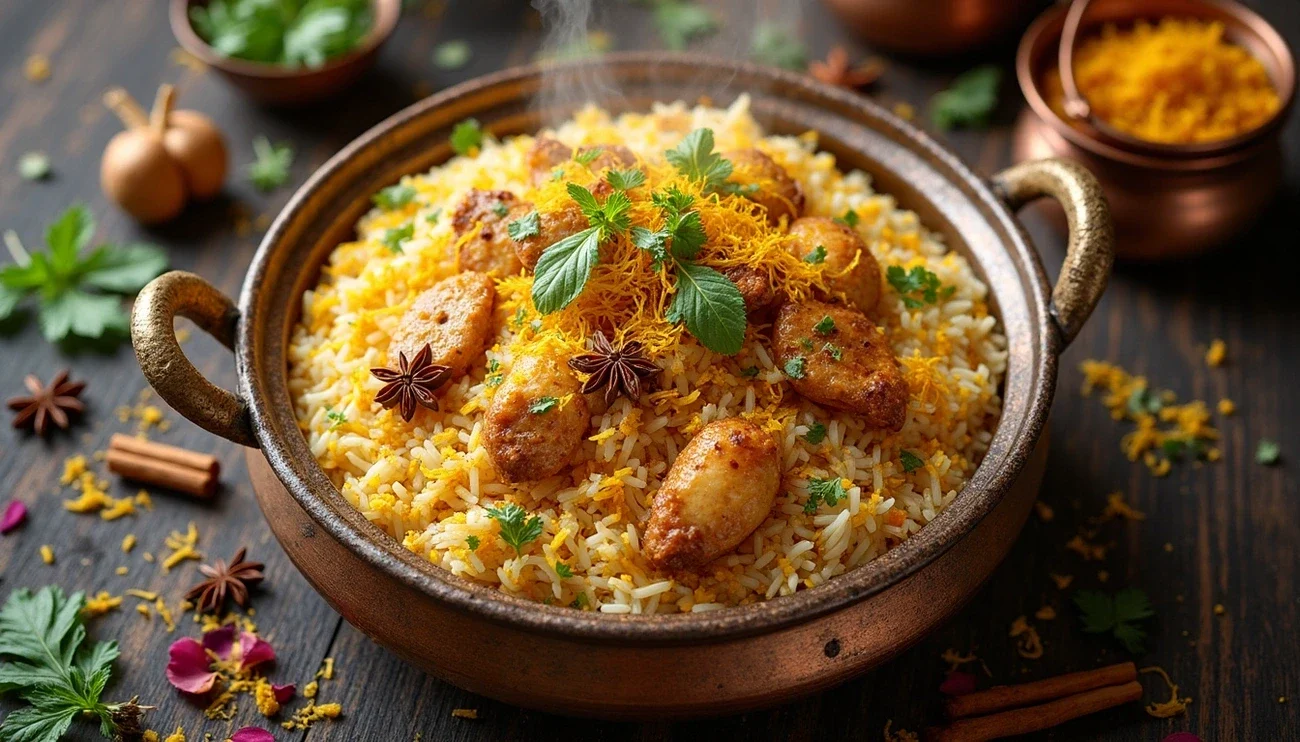
For an extra dimension of aroma, consider adding saffron threads soaked in warm milk to the final layers of your biryani . This not only imparts a beautiful golden hue to portions of the rice but also contributes a subtle, distinctive flavor that’s characteristic of restaurant-style preparations.
Marinate the Chicken Like a Pro
Proper marination stands as the backbone of an exceptional biryani recipe, transforming ordinary chicken into succulent, flavor-packed morsels that form the heart of this classic dish. Mastering this critical step separates mediocre homemade versions from restaurant-quality biryani.
Why yogurt is key to tender meat
The secret to incredibly tender chicken in biryani lies primarily in yogurt-based marination. Plain yogurt contains natural acids and enzymes that break down the protein structures in meat, leading to exceptionally tender results. This tenderizing action penetrates deep into the chicken pieces, ensuring they remain juicy and succulent even after the lengthy cooking process.
Beyond tenderizing, yogurt serves as an excellent carrier for spices, allowing them to adhere evenly to the meat rather than simply sliding off. The thick consistency coats each piece thoroughly, creating a protective layer that prevents the chicken from drying out during cooking.
For best results, always use plain, unsweetened yogurt (Indian curd) in your marinade . If using Greek yogurt, which is thicker and contains less moisture, consider adding a small amount of lemon juice to enhance the tenderizing effect. Furthermore, avoid using sour yogurt as it can overpower the delicate balance of flavors .
How long to marinate for best results
Time plays a crucial role in developing flavor and tenderness. The minimum marination period should be 30 minutes , though most chefs recommend at least 1-2 hours for decent results . Nevertheless, for truly restaurant-quality biryani, an overnight marination in the refrigerator yields substantially better outcomes.
Extended marination of 12-24 hours allows the yogurt and spices to fully penetrate the meat fibers, resulting in chicken that’s remarkably flavorful throughout rather than just on the surface . This extended period essentially transforms the structure of the protein, making it exceptionally tender .
For those short on time, keep these points in mind:
1. If marinating for just 2 hours, cut chicken into smaller pieces to allow faster penetration
2. Even a 3-hour marination will deliver noticeable improvement in flavor
3. Refrigerate the marinating chicken regardless of duration
Adding fried onions to the marinade
A distinguishing feature of restaurant-style biryani is the incorporation of crispy fried onions (birista) directly into the marinade. This often-overlooked step adds remarkable depth and complexity to the final dish.
To prepare fried onions, thinly slice onions and separate the layers before deep-frying in hot oil until they reach a light golden brown color and become crisp . After cooling, add approximately one-fourth of these fried onions to the marinated chicken and mix thoroughly. The remaining fried onions will be used for layering and garnishing later in the cooking process.
The fried onions infuse the marinade with their caramelized sweetness and aromatic compounds, creating a more complex flavor profile. These crispy bits eventually dissolve into the marinade, enriching the gravy base with their deep umami notes and characteristic biryani aroma.
For convenience, store-bought crispy fried shallots or onions can substitute homemade versions. Look for these in the Asian section of supermarkets or Asian grocery stores, where they’re often more affordable than in regular supermarkets.
A complete chicken marinade for restaurant-style biryani typically includes:
• 1 cup plain yogurt
• 1-1.5 tablespoons ginger-garlic paste
• 1/2-1 teaspoon turmeric powder
• 1/2-1 teaspoon red chili powder (adjust to taste)
• 1/2-1 tablespoon garam masala or biryani masala
• 1/2 teaspoon salt (or to taste)
• 2 tablespoons chopped fresh mint leaves
• 1 tablespoon lemon juice (optional)
• 2 tablespoons fried onions
Mix all ingredients thoroughly before adding chicken pieces with small slits cut into them to allow deeper penetration of flavors.
Cook the Chicken and Rice Separately
The art of cooking biryani components separately is what separates home attempts from restaurant-quality results. This critical technique ensures each element retains its distinct character yet harmonizes perfectly when combined.
Making the chicken gravy base
Once your chicken has been properly marinated, the next step is creating a rich gravy base. Begin by heating ghee or oil in a heavy-bottomed pot. Adding whole spices—bay leaves, cardamom pods, cloves, cinnamon sticks, and star anise—creates an aromatic foundation as they release their essential oils into the fat.
After the spices become fragrant, add sliced onions and sauté until they begin to brown. This caramelization process typically takes 3-5 minutes and builds crucial flavor complexity. Subsequently, incorporate ginger-garlic paste and cook until it stops sputtering, being careful not to let it burn.
For authentic restaurant-style results, add your spice mixture (including turmeric, chili powder, and coriander powder) and sauté briefly on medium-low heat. Thereafter, introduce diluted tomato paste or fresh tomatoes, giving them time to cook down and intensify . Finally, add the marinated chicken, stirring regularly until it reaches an internal temperature of 150°F—mostly but not fully cooked.
Parboiling rice with whole spices
Simultaneously, prepare your rice through careful parboiling. First, thoroughly rinse the rice until water runs clear, then soak for 30 minutes to remove excess starch . This essential step ensures separate, fluffy grains in the final dish.
In a separate pot, bring water to a rolling boil with whole spices—green cardamom, cloves, cinnamon, and bay leaves. Some chefs recommend tying these spices in muslin cloth for easy removal. Add salt, which should make the water taste slightly salty, plus a splash of lemon juice or vinegar.
Once boiling vigorously, drain and add your soaked rice. For aged basmati, cook uncovered for precisely 5-5.5 minutes until grains are 70-80% cooked. They should feel firm but not raw when pressed between fingers. Drain immediately to prevent overcooking from residual heat.
Timing both components perfectly
Synchronizing these two elements requires careful attention. Your chicken should finish cooking just as your rice reaches the parboiled stage. For chicken, look for these indicators of readiness:
• Mostly opaque appearance with no pink visible
• Internal temperature of approximately 150°F
• Tender when pierced with a fork
• Gravy thickened but not completely reduced
For rice, timing is equally crucial:
• At 3 minutes: Rice still has raw center
• At 4 minutes: Center mostly cooked but kernel remains tough
• At 5 minutes: Rice is just-cooked but still firm—ideal stopping point
• Beyond 6 minutes: Rice becomes fragile and may break during layering
Drain the rice promptly to halt cooking and optionally rinse with cold water. Consequently, both components will be perfectly prepared for the layering and dum cooking process that follows, each bringing optimal texture and flavor to the final biryani recipe.
Layer and Dum Cook the Biryani
The layering and dum cooking process represents the climax of biryani preparation, where separate components unite to create a harmonious blend of flavors and textures.
How to layer rice and chicken
Proper layering technique transforms individually prepared components into an integrated masterpiece. Begin by greasing your heavy-bottomed pot with ghee to prevent sticking. For optimal flavor distribution, start with a rice layer (approximately 40% of your cooked rice) as the foundation. Next, add most chicken pieces from your prepared curry, spreading some gravy across the rice . Sprinkle fresh herbs and fried onions over this meat layer. Continue with another rice layer (another 40%), followed by remaining chicken pieces and most of the remaining gravy. Add another layer of herbs and fried onions. Finish with the final rice layer (remaining 20%) and top with the last bit of curry gravy. This methodical layering ensures every serving contains a perfect balance of components.
Using saffron milk and ghee
Saffron-infused milk adds both visual appeal and aromatic complexity. Prepare by soaking saffron threads in hot milk for approximately 10 minutes. Once your layers are complete, drizzle this saffron milk across the top rice layer, focusing on white patches for beautiful color contrast. Additionally, dot the surface with ghee or melted butter. This combination not only enhances flavor but creates the characteristic biryani aroma that signals authenticity.
Sealing the pot for dum cooking
The defining characteristic of traditional biryani is the dum cooking method, which requires an airtight seal. Several effective sealing techniques exist:
4. Aluminum foil: Cover pot with two layers of foil, crimping edges tightly
5. Dough seal: Create a simple flour-water dough and apply around the pot’s rim
6. Kitchen towel: Place a moist cloth over the pot before adding the lid
A proper seal prevents steam from escaping, thereby creating pressure that forces flavors to mingle .
How long to steam for perfect texture
Timing is crucial for achieving perfect texture. For oven method, bake sealed biryani at 350°F (180°C) for 20-30 minutes. If using stovetop dum cooking, place the pot over low heat for 15-20 minutes. Thereafter, allow the biryani to rest undisturbed for 10-20 minutes before opening. This resting period is non-negotiable as it allows flavors to fully integrate while excess moisture distributes evenly.
Tips to Make It Restaurant-Style
Even with the best ingredients and techniques, certain professional touches elevate a good biryani recipe to restaurant-quality standards. The difference often lies in these final details.
Using fried onions for garnish and flavor
Birista (crispy fried onions) are absolutely essential for authentic biryani. Beyond mere garnish, they infuse the dish with a unique earthy flavor and delightful crunch in every bite. Properly made birista should be thinly and evenly sliced, then fried until golden brown and crisp. The resulting onions not only enhance presentation but contribute a distinct umami element that commercially-prepared versions often lack.
For convenience, you can prepare birista in advance and store them in the freezer for up to six months. Moreover, don’t discard the frying oil—it captures intense onion flavor that can be used during the layering process.
Avoiding soggy or dry rice
The hallmark of restaurant-style biryani is perfectly cooked, separate grains of rice. To achieve this:
• Wash rice thoroughly (5-6 times) until water runs clear to remove excess starch
• Soak the rice for at least 30 minutes before cooking
• Add a tablespoon of oil or ghee to the cooking water
• Cook rice until it’s only 70-80% done—it should still have a slight bite
• Spread partially cooked rice under a fan to cool quickly before layering
Remember that fat is flavor—don’t skimp on the recommended ghee or oil quantities. Additionally, season the rice cooking water generously with whole spices and salt.
Choosing the right pot or Dutch oven
A proper cooking vessel fundamentally affects your biryani’s outcome. Always use a heavy-bottomed pot to distribute heat evenly and prevent burning. For traditional dum cooking, the pot should have a tight-fitting lid to trap steam effectively.
To further prevent sticking, place the pot on a tawa (flat pan) during the final cooking stage. Alternatively, use a Dutch oven or pressure cooker (without gasket and weight) for excellent results.
How to serve biryani in layers
Restaurant-style serving preserves the carefully crafted layers. Scoop biryani from one side of the pot without mixing the layers. Each portion should contain rice from the top and chicken from the bottom in distinct layers. This presentation showcases the visual contrast between the aromatic rice, colorful spices, and rich meat below.

Conclusion
Creating restaurant-style biryani at home no longer needs to feel like an impossible challenge. Throughout this guide, we’ve unveiled the professional techniques and secrets that transform ordinary homemade biryani into an extraordinary culinary masterpiece.
Aged basmati rice truly stands as the foundation of exceptional biryani, while bone-in chicken pieces provide depth and richness impossible to achieve with boneless cuts alone. Additionally, the careful selection of whole and ground spices creates that distinctive aroma and flavor profile that defines authentic biryani.
Proper marination certainly makes all the difference. Yogurt works as a natural tenderizer, while extended marination allows flavors to penetrate deeply into the meat. The addition of fried onions to the marinade contributes remarkable complexity that casual home cooks often overlook.
Separate cooking of components, followed by meticulous layering and proper dum cooking, results in the perfect texture combination – fluffy rice with tender, flavor-infused meat. This method allows each ingredient to maintain its integrity while harmonizing beautifully with others.
Remember, attention to detail ultimately separates good biryani from exceptional biryani. Crispy fried onions, saffron-infused milk, generous ghee, and the right cooking vessel all contribute significantly to achieving restaurant-quality results.
Armed with these techniques and insights, you can confidently prepare biryani that rivals your favorite restaurant’s version. Your friends and family will undoubtedly marvel at your culinary skills as you present this iconic dish with its distinct layers and intoxicating aroma.
The journey to mastering biryani takes practice, but the results are unquestionably worth the effort. After all, few dishes match the sensory delight and satisfaction of a perfectly executed biryani served straight from your kitchen.